If I had to pick one thing that separates RV owners who keep their rigs for 15 years from those who junk them at 8, it's roof maintenance. The roof is your RV's first line of defense, and in Martin County, it takes a beating from three directions: relentless UV radiation that breaks down sealant and rubber membranes, a 6-month hurricane season that dumps torrential rain, and salt-laden air from the Atlantic that corrodes anything metallic.
I've resealed, patched, and recoated hundreds of RV roofs over the past 14 years. The ones that last are the ones that get consistent attention. The ones that fail always have the same story: "I haven't been up there in a couple years." In Florida, a couple years is long enough for a small crack to become a $4,000 floor repair.
Understanding Your RV Roof Type
Before you touch your roof, you need to know what it's made of. Using the wrong cleaner or sealant will cause more harm than good.
EPDM (Rubber) Roofs
The most common RV roof material. It's a synthetic rubber membrane that's flexible, lightweight, and relatively inexpensive to replace. It handles thermal expansion well, which matters in Florida where roof surface temps can swing 60+ degrees between early morning and afternoon. The downside: EPDM oxidizes over time, turning chalky white, and UV exposure is its biggest enemy. Clean with a dedicated EPDM roof cleaner, not household products. Petroleum-based cleaners will destroy it.
TPO (Thermoplastic) Roofs
Newer RVs increasingly use TPO. It reflects UV better than EPDM, resists oxidation longer, and is easier to clean. The tradeoff: TPO is harder to repair with patches, and it requires specific adhesives. It's also less forgiving of standing water, which can be an issue if your RV doesn't have great drainage slope.
Fiberglass Roofs
Found primarily on Class A coaches and higher-end fifth wheels. Fiberglass is the most durable option and requires the least maintenance. It can crack under impact and develops crazing (hairline surface cracks) over years of UV exposure, but it doesn't degrade the way rubber does. When fiberglass cracks, the repair involves gel coat or epoxy work, which is specialized.
The Martin County Roof Care Calendar
Here's the seasonal schedule I follow and recommend for every RV stored or used in Martin County.
January: Annual Deep Inspection
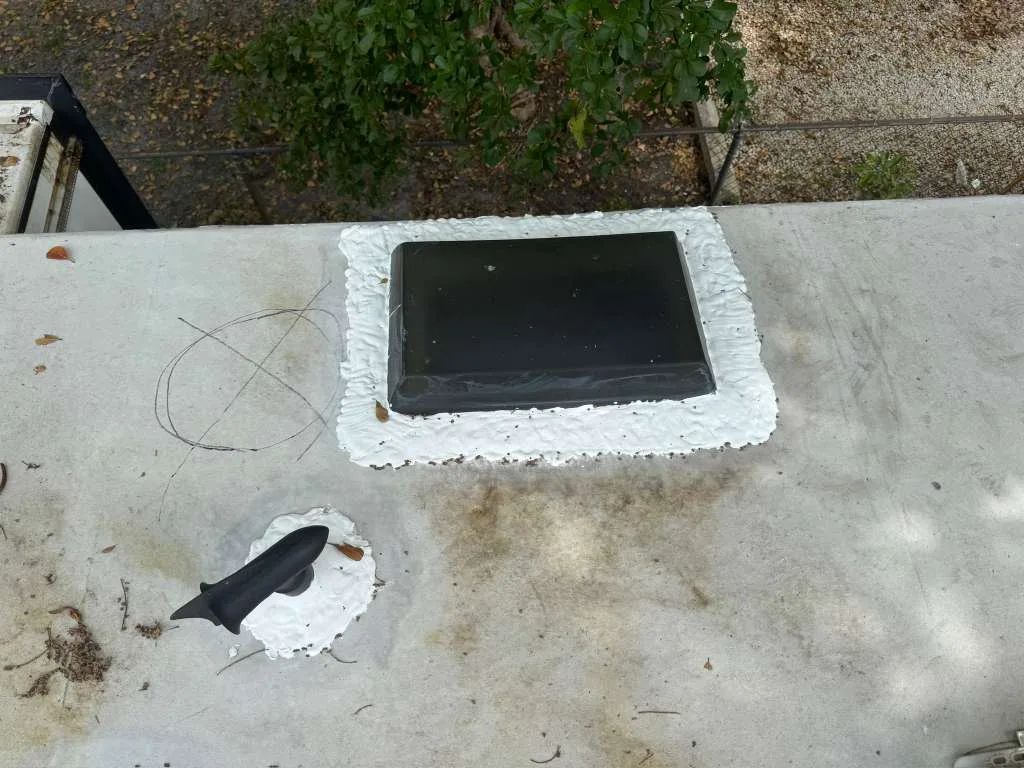
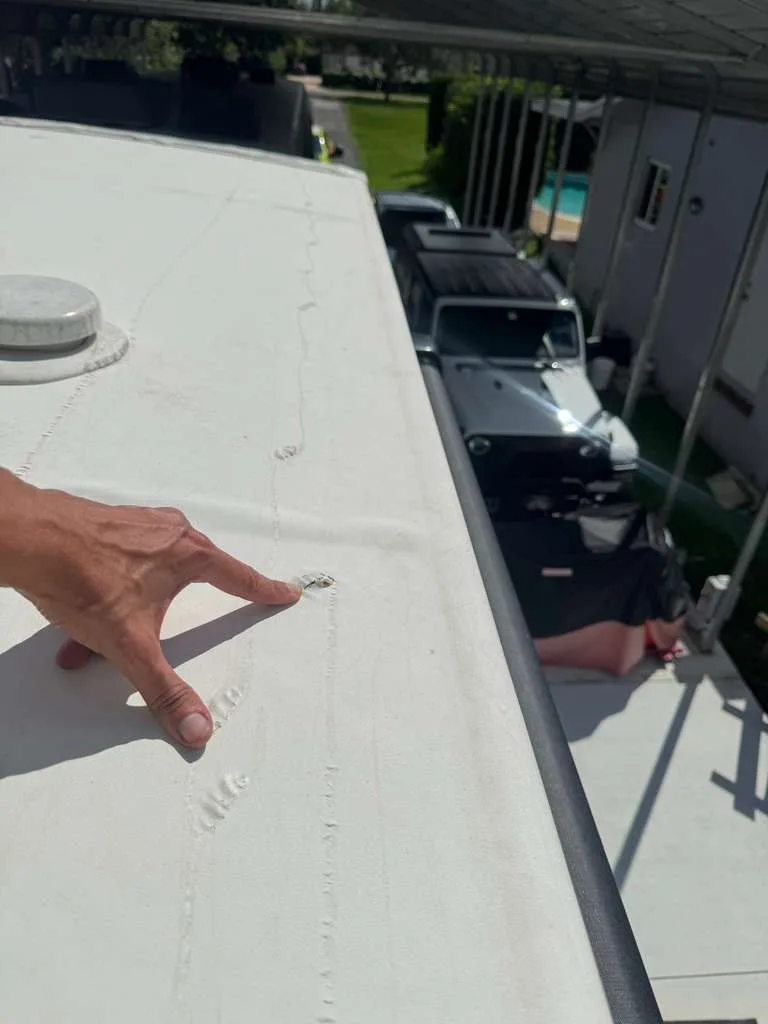
Start the year with a comprehensive roof walk-through. Clean the entire roof surface with the appropriate cleaner for your roof type. Once it's clean, inspect every inch of sealant around vents, skylights, the AC unit, antenna mounts, ladder brackets, and roof edge transitions. Look for cracks, gaps, lifting, or areas where the sealant has separated from the roof surface.
Check the roof membrane itself for soft spots (press with your hand), tears, punctures, or areas where the material looks thin or worn through. If you find areas that have excessive oxidation (chalky buildup that won't come off with cleaning), that section may need a protective coating or replacement.
April: Pre-Storm Season Seal Check
Before the rainy season begins (typically late May), do a targeted sealant inspection and touch-up. Focus on every penetration point and every seam. This is the most critical maintenance window of the year. If your sealant has any cracks or gaps, fix them now. Once the daily afternoon thunderstorms start, water is finding every weakness.
Apply Dicor self-leveling sealant to any horizontal cracks. For vertical seams (like where the roof meets the sidewall cap), use Dicor non-sag sealant. Clean the area with denatured alcohol first for proper adhesion.
July: Mid-Season Quick Check
You've been through two months of daily rain. Get up on the roof after a storm and look for standing water (drainage issues), new sealant cracks, and any debris that's accumulated. Clear branches, leaves, and anything else that's sitting on the roof. Organic debris holds moisture against the roof surface and accelerates degradation.
October: Post-Hurricane Season Inspection
After the last major storm threat passes, do a full inspection similar to January. High winds during tropical storms and hurricanes can pull sealant loose, shift AC shrouds, and damage antenna mounts. Even if your RV wasn't in the direct path of a storm, high winds and rain bands extend well beyond the eye. According to NOAA's Melbourne office, Martin County regularly experiences tropical storm-force winds even from storms that make landfall hundreds of miles away.
Sealant Products That Work in Florida
Not all sealants are created equal, and the wrong choice in Florida's climate is worse than no sealant at all.
- Dicor Self-Leveling Lap Sealant: The industry standard for horizontal seams. It flows into cracks and self-levels, creating a smooth, waterproof seal. Compatible with EPDM and TPO. About $12 per tube. Keep 2 to 3 on hand.
- Dicor Non-Sag Sealant: For vertical joints where self-leveling would drip. Same chemistry, different consistency. Essential for sidewall cap joints.
- Geocel Pro Flex RV: A good alternative that works on all roof types. More flexible than some competitors, which helps in Florida's extreme temperature swings.
- Eternabond Tape: For emergency patches and as a backup seal over sealant. This stuff adheres like nothing else and can buy you months of protection while you schedule a proper repair.
When to Recoat vs. When to Reseal
Resealing means touching up or replacing the sealant around penetrations and seams. You should be doing this annually at minimum. It costs $75 to $200 if you hire us, or $20 to $50 in materials if you DIY. Resealing is maintenance.
Recoating means applying a liquid coating over the entire roof membrane to restore UV protection and create a new waterproof barrier. For rubber roofs in Florida, plan on recoating every 3 to 5 years. A DIY kit (like Dicor's EPDM coating system) runs $300 to $600 in materials for a 30-foot RV. Professional recoating costs $1,500 to $3,500 depending on size and prep work needed.
If your roof membrane itself is torn, punctured, or delaminating from the decking, you're looking at replacement, not recoating. That's a bigger job that runs $3,000 to $8,000+ depending on the roof type and size.
Hurricane Prep for Your RV Roof
Martin County sits right in the hurricane zone. Here's what I tell every customer before June.
- Reseal everything. Don't enter hurricane season with questionable sealant. Fix it all before the first tropical system.
- Secure roof accessories. Check that antenna mounts, solar panel brackets, and AC shrouds are bolted tight. High winds love to grab these and peel them up, taking roofing material with them.
- Remove awnings. Retract and secure your awning. Extended awnings in high winds get destroyed and can damage the roof and sidewall when they rip off.
- Check your parking spot. Park away from trees if possible. A falling branch punches through an RV roof like paper.
- Post-storm inspection. After any tropical storm or hurricane, get on the roof within 24 hours and inspect for damage. The sooner you catch a breach, the less water gets in.
Signs Your Roof Needs Professional Attention
Some roof issues are beyond DIY. Call a tech when you see these:
- Soft spots on the roof surface that compress when you step on them
- Interior ceiling stains that keep growing despite your resealing efforts
- Roof membrane that's pulling away from the decking or edges
- Multiple areas of sealant failure across the roof at the same time
- Standing water that doesn't drain within 48 hours after rain
- Any damage from a storm that involves torn or punctured roofing
We handle everything from spot reseals to full roof recoats and replacements. If you're in Martin County and your roof needs attention, call 772-271-5270. We'll assess it, give you an honest answer on what it needs, and handle the work mobile at your location.